This is an old revision of the document!
Table of Contents
PFSense - Restore from Backup
Download pfSense image
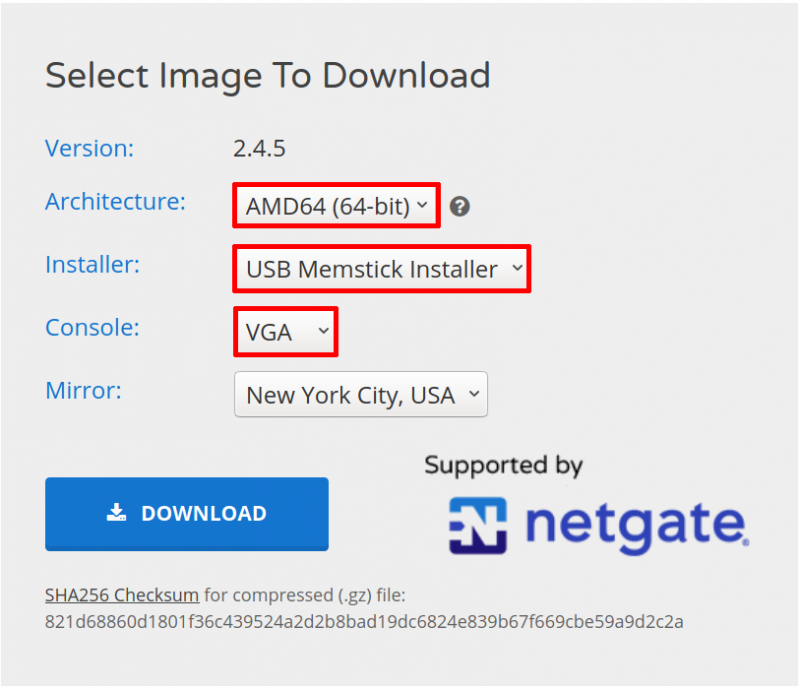
Go to https://www.pfsense.org/download/ and select the USB Memstick Installer.
NOTE: The options here are what I use.
- Architecture: AMD64 (64-bit). As I use an AMD or Intel device as the router.
- Installer: USB Memstick Installer. As I will install from a USB.
- Console: VGA. As I will plug a Keyboard and Monitor into the router; and will not be setting this up via a Serial cable.
Choose different options as required.
Burn the pfSense image on to a USB drive
sudo dd if=pfSense-CE-memstick-2.4.5-RELEASE-amd64.img of=/dev/sdb
ALERT: Make sure that if= specifies the exact location of the downloaded file and of= specifies your USB device.
If you make a mistake here, you might overwrite your hard drive!
There are many ways to check which device is connected to the USB including:
dmesg
returns:
...
[411849.265872] usb 3-2: new high-speed USB device number 6 using xhci_hcd
[411849.418209] usb 3-2: New USB device found, idVendor=048d, idProduct=1234
[411849.418210] usb 3-2: New USB device strings: Mfr=1, Product=2, SerialNumber=3
[411849.418211] usb 3-2: Product: Disk 2.0
[411849.418212] usb 3-2: Manufacturer: USB
[411849.418212] usb 3-2: SerialNumber: 2146711134684684
[411849.418481] usb-storage 3-2:1.0: USB Mass Storage device detected
[411849.418603] scsi host12: usb-storage 3-2:1.0
[411850.422697] scsi 12:0:0:0: Direct-Access     VendorCo ProductCode      2.00 PQ: 0 ANSI: 4
[411850.422989] sd 12:0:0:0: Attached scsi generic sg1 type 0
[411850.423703] sd 12:0:0:0: [sdb] 3891200 512-byte logical blocks: (1.99 GB/1.86 GiB)
[411850.423817] sd 12:0:0:0: [sdb] Write Protect is off
[411850.423819] sd 12:0:0:0: [sdb] Mode Sense: 03 00 00 00
[411850.423936] sd 12:0:0:0: [sdb] No Caching mode page found
[411850.423941] sd 12:0:0:0: [sdb] Assuming drive cache: write through
[411850.426796]  sdb: sdb1 sdb2 sdb3
                 sdb2: <bsd: sdb5 >
[411850.427528] sd 12:0:0:0: [sdb] Attached SCSI removable disk
In this example, the device is shown as sdb.
If you are using Windows, use Rufus: https://rufus.akeo.ie/.
Using a Serial Cable (optional)
Connect the console cable to the router.
Make sure that your tty device shows up in /dev.
- If you have a USB cable, you should see /dev/ttyUSB0.
- If you have a regular cable you should see /dev/ttyS0.
Verify:
ls /dev/ttyUSB0
returns:
/dev/ttyUSB0
The same instructions would apply for /dev/ttyS0 if you used that type of cable instead of a USB console cable.
NOTE: If you are using Windows, your Serial port will simply be called COM1.
Connect using Putty.
Make sure you have putty installed, and start it as root:
sudo putty
- Serial line: /dev/ttyUSB0. or ttyS0 if not using a USB console cable.
- Connection type: Serial.
- Speed: 115200.
NOTE: If you use Windows, launch putty with administrative privileges.
Click open and your session should start.
NOTE: You may need to go into the BIOS of the router to allow it to boot up from the USB.
You also may need to press a key, such as F10 to make sure your USB stick has been detected.


