This is an old revision of the document!
Table of Contents
PFSense - pfBlockerNG - Install pfBlockerNG
There are multiple parts to this:
General Settings
Navigate to Firewall → pfBlockerNG.
Within the General section:
- pfBlockerNG: Checked. This enabled pfBlockerNG.
- Keep Settings: Checked. pgBlockerNG can remember any settings even against upgrades of the software.
- CRON Settings: Every Hour 00 0 0.
- Download Failure Threshold: No Limit.
Within the Log Settings section:
- Keep all settings at default: 20000.
Scroll to the bottom of the page and click the Save button.
General Tab should look like this:
IP Configuration
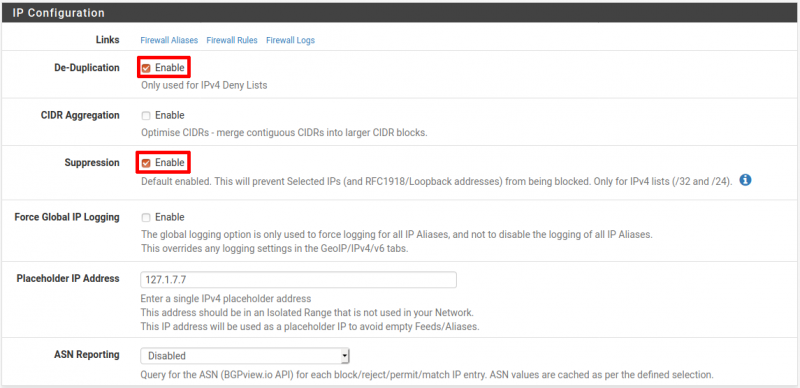
Navigate to Firewall → pfBlockerNG → IP.
Within the IP Configuration section:
- De-Duplication: Checked
- CIDR Aggregation: Not checked
- Suppression: Checked
- Force Global IP Logging: Not checked
- Placeholder IP Address: 127.1.7.7
- ASN Reporting: Disabled
MaxMind GeoIP configuration
Navigate to Firewall → pfBlockerNG → IP.
Within the MaxMind GeoIP configuration section:
- MaxMind License Key: Enter the MaxMind License Key. If you don't have a key, register for one on the Maxmind Site.
- MaxMind Localized Language: English.
- MaxMind CSV Updates: Not Checked.
IP Interface/Rules Configuration
Within the IP Interface/Rules Configuration section:
- Inbound Firewall Rules: WAN and Block.
- Outbound Firewall Rules: LAN and Reject.
- If you have more than one internal interfaces, press CTRL or CMD (for Mac users) and click on interfaces.
- Floating Rules: Not Checked.
- Firewall 'Auto' Rule Order: Select the top option.
- Firewall 'Auto' Rule Suffix: auto rule.
- Kill States: Checked.
Scroll to the bottom of the page and click the Save button.
Setup Custom IP Lists
See IP Lists
Navigate to Firewall → pfBlockerNG → IP → IPv4.
Click the Add button.
Give it a Name and Description.
Add in as many IP Source Definitions as needed.
Set:
- State: ON.
- Action: Deny Both.
- Update Frequency: Once per day.
For Example:
Enable DNSBL
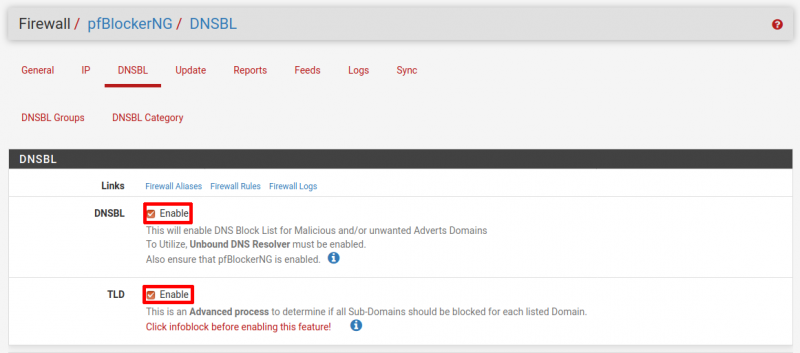
Navigate to Firewall → pfBlockerNG → DNSBL and check the box for Enable DNSBL.
Optionally, if you have a lot of RAM, you can also enable TLD. This setting enables additional processing to block ALL sub-domains for advanced blocking. For example, a list with sharewiz.net would also result in blog.sharewiz.net also being blocked if TLD is enabled.
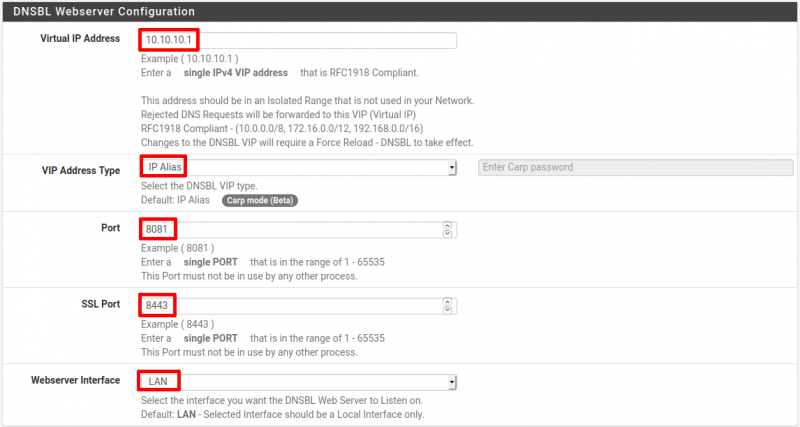
Locate the DNSBL Webserver Configuration section:
- Virtual IP Address: 10.10.10.1. This is the default IP address and should be fine. Only change if needed. Enter an IP address that is not in your internal networks, something like 10.10.10.10.
- VIP Address Type: IP Alias. The default. Only change if needed.
- Port: 8081. The default. Only change if needed.
- SSL Port: 8443. The default. Only change if needed.
- Webserver Interface: LAN. The default. Only change if needed. Select LAN or another internal interface to listen on.
Locate Permit Firewall Rules within the DNSBL Configuration section:
- If you ONLY have one LAN interface, leave this setting unchecked.
- If you have multiple LAN interfaces, check this setting and select each interface to protect.
- Scroll to the bottom of the page and click the Save button.
Locate the DNSBL Whitelist Section:
- See DNSBL Whitelist.
- Enter the following white-list domains and modify as you like:
.play.google.com
.drive.google.com
.accounts.google.com
.www.google.com
.github.com
.outlook.live.com
.edge-live.outlook.office.com # CNAME for (outlook.live.com)
.outlook.ha-live.office365.com # CNAME for (outlook.live.com)
.outlook.ha.office365.com # CNAME for (outlook.live.com)
.outlook.ms-acdc.office.com # CNAME for (outlook.live.com)
.amazonaws.com
.login.live.com
.login.msa.akadns6.net # CNAME for (login.live.com)
.ipv4.login.msa.akadns6.net # CNAME for (login.live.com)
.mail.google.com
.googlemail.l.google.com # CNAME for (mail.google.com)
.pbs.twimg.com
.wildcard.twimg.com # CNAME for (pbs.twimg.com)
.sites.google.com
.www3.l.google.com # CNAME for (sites.google.com)
.docs.google.com
.mobile.free.fr
.plus.google.com
.samsungcloudsolution.net
.samsungelectronics.com
.icloud.com
.microsoft.com
.windows.com
.skype.com
.googleusercontent.com
Locate DNSBL IPs section:
- List Action: Deny Both.
- Enable Logging: Enable.
Scroll to the bottom of the page and click the Save button.
Setup DNSBL EasyLists
Navigate to Firewall → pfBlockerNG → Feeds.
Scroll down to the DNSBL Category section.
Select the Easylist by clicking on the + key towards the left side.
Set EasyList Feeds to:
- State: ON
- Action: Unbound
- Update Frequency: Once per day
Scroll to the bottom of the page and click the Save button.
Setup Custom DNSBL Lists
Navigate to Firewall → pfBlockerNG → DNSBL → DNSBL Groups.
Click the Add button.
Give it a Name and Description.
Add in as many DNSBL Source Definitions as needed.
Set:
- State: ON
- Action: Unbound
- Update Frequency: Once per day
For Example:
Update Lists
Updates are run on the schedule earlier.
However, the first one must be initiated manually to take effect immediately.
Navigate to Firewall → pfBlockerNG → Update.
Click the radio button for Update and click the Run button.
Observe the log viewer as the update processes and allow it a couple minutes to finish.
After the initial update, you should notice ads are now being blocked in your browser.
Check the Services
Testing from the command line
Normally, pinging a site will return the sites actual IP address.
However, with pfBlockerNG properly setup you may instead see a reply of 10.10.10.1, which is the default virtual IP address DNSBL creates:
For sites that are allowed to get through, their proper IP address will be returned by a ping instead of 10.10.10.1:
The same goes for an nslookup query, which will also return a response of 10.10.10.1 for adverts:
For sites that are allowed to get through, their proper IP address will be returned instead of 10.10.10.1.


