This is an old revision of the document!
Table of Contents
PFSense - pfBlockerNG - Install pfBlockerNG
There are multiple parts to this:
First Install - Wizard
Navigate to Firewall → pfBlockerNG.
The first time you visit this link, the following Wizard will be shown.
Click Next.
A warning is shown that ALL settings will be wiped.
Click Next.
IP Component Configuration
Now select the input and output interfaces.
For now, even though there are other interfaces, just select the defaults.
DNSBL Component Configuration
Finalized
General Settings
Navigate to Firewall → pfBlockerNG.
Within the General section:
- pfBlockerNG: Checked. This enabled pfBlockerNG.
- Keep Settings: Checked. pgBlockerNG can remember any settings even against upgrades of the software.
- CRON Settings: Every Hour 00 0 0.
- Download Failure Threshold: No Limit.
Within the Log Settings section:
- Keep all settings at default: 20000.
Scroll to the bottom of the page and click the Save button.
General Tab should look like this:
IP Configuration
Navigate to Firewall → pfBlockerNG → IP.
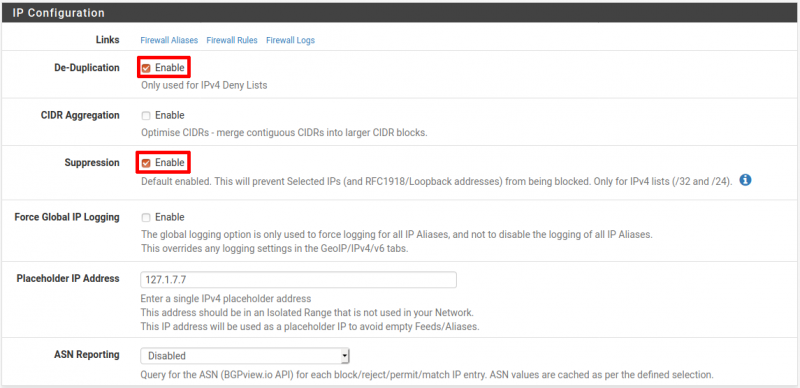
Within the IP Configuration section:
- De-Duplication: Checked
- CIDR Aggregation: Not checked
- Suppression: Checked
- Force Global IP Logging: Not checked
- Placeholder IP Address: 127.1.7.7
- ASN Reporting: Disabled
MaxMind GeoIP configuration
Navigate to Firewall → pfBlockerNG → IP.
Within the MaxMind GeoIP configuration section:
- MaxMind License Key: Enter the MaxMind License Key. If you don't have a key, register for one on the Maxmind Site.
- MaxMind Localized Language: English.
- MaxMind CSV Updates: Not Checked.
IP Interface/Rules Configuration
Within the IP Interface/Rules Configuration section:
- Inbound Firewall Rules: WAN and Block.
- Outbound Firewall Rules: LAN and Reject.
- If you have more than one internal interfaces, press CTRL or CMD (for Mac users) and click on interfaces.
- Floating Rules: Not Checked.
- Firewall 'Auto' Rule Order: Select the top option.
- Firewall 'Auto' Rule Suffix: auto rule.
- Kill States: Checked.
Scroll to the bottom of the page and click the Save button.
Setup Custom IP Lists
See IP Lists
Navigate to Firewall → pfBlockerNG → IP → IPv4.
Click the Add button.
Give it a Name and Description.
Add in as many IP Source Definitions as needed.
Set:
- State: ON.
- Action: Deny Both.
- Update Frequency: Once per day.
For Example:
Enable DNSBL
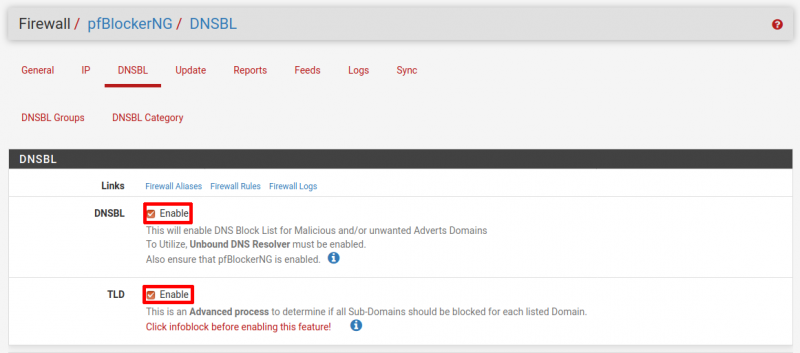
Navigate to Firewall → pfBlockerNG → DNSBL and check the box for Enable DNSBL.
Optionally, if you have a lot of RAM, you can also enable TLD. This setting enables additional processing to block ALL sub-domains for advanced blocking. For example, a list with sharewiz.net would also result in blog.sharewiz.net also being blocked if TLD is enabled.
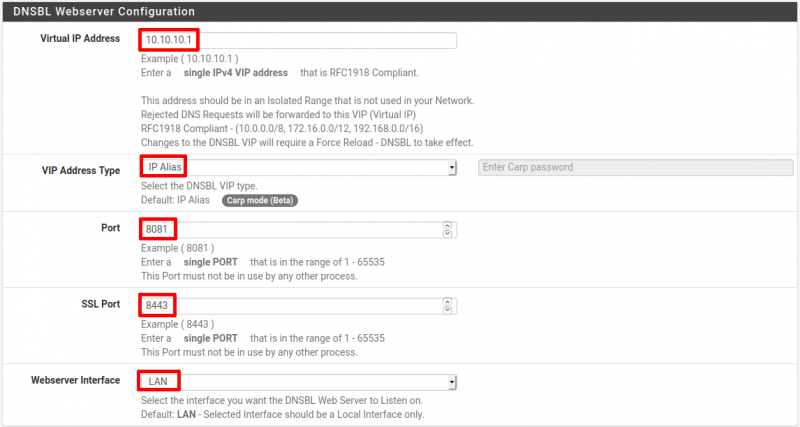
Locate the DNSBL Webserver Configuration section:
- Virtual IP Address: 10.10.10.1. This is the default IP address and should be fine. Only change if needed. Enter an IP address that is not in your internal networks, something like 10.10.10.10.
- VIP Address Type: IP Alias. The default. Only change if needed.
- Port: 8081. The default. Only change if needed.
- SSL Port: 8443. The default. Only change if needed.
- Webserver Interface: LAN. The default. Only change if needed. Select LAN or another internal interface to listen on.
Locate Permit Firewall Rules within the DNSBL Configuration section:
- If you ONLY have one LAN interface, leave this setting unchecked.
- If you have multiple LAN interfaces, check this setting and select each interface to protect.
- Scroll to the bottom of the page and click the Save button.
Locate the DNSBL Whitelist Section:
- See DNSBL Whitelist.
- Enter the following white-list domains and modify as you like:
.play.google.com
.drive.google.com
.accounts.google.com
.www.google.com
.github.com
.outlook.live.com
.edge-live.outlook.office.com # CNAME for (outlook.live.com)
.outlook.ha-live.office365.com # CNAME for (outlook.live.com)
.outlook.ha.office365.com # CNAME for (outlook.live.com)
.outlook.ms-acdc.office.com # CNAME for (outlook.live.com)
.amazonaws.com
.login.live.com
.login.msa.akadns6.net # CNAME for (login.live.com)
.ipv4.login.msa.akadns6.net # CNAME for (login.live.com)
.mail.google.com
.googlemail.l.google.com # CNAME for (mail.google.com)
.pbs.twimg.com
.wildcard.twimg.com # CNAME for (pbs.twimg.com)
.sites.google.com
.www3.l.google.com # CNAME for (sites.google.com)
.docs.google.com
.mobile.free.fr
.plus.google.com
.samsungcloudsolution.net
.samsungelectronics.com
.icloud.com
.microsoft.com
.windows.com
.skype.com
.googleusercontent.com
Locate DNSBL IPs section:
- List Action: Deny Both.
- Enable Logging: Enable.
Scroll to the bottom of the page and click the Save button.
Setup DNSBL EasyLists
Navigate to Firewall → pfBlockerNG → Feeds.
Scroll down to the DNSBL Category section.
Select the Easylist by clicking on the + key towards the left side.
Set EasyList Feeds to:
- State: ON
- Action: Unbound
- Update Frequency: Once per day
Scroll to the bottom of the page and click the Save button.
Setup Custom DNSBL Lists
Navigate to Firewall → pfBlockerNG → DNSBL → DNSBL Groups.
Click the Add button.
Give it a Name and Description.
Add in as many DNSBL Source Definitions as needed.
Set:
- State: ON
- Action: Unbound
- Update Frequency: Once per day
For Example:
Update Lists
Updates are run on the schedule earlier.
However, the first one must be initiated manually to take effect immediately.
Navigate to Firewall → pfBlockerNG → Update.
Click the radio button for Update and click the Run button.
Observe the log viewer as the update processes and allow it a couple minutes to finish.
After the initial update, you should notice ads are now being blocked in your browser.
Check the Services
Testing from the command line
Normally, pinging a site will return the sites actual IP address.
However, with pfBlockerNG properly setup you may instead see a reply of 10.10.10.1, which is the default virtual IP address DNSBL creates:
For sites that are allowed to get through, their proper IP address will be returned by a ping instead of 10.10.10.1:
The same goes for an nslookup query, which will also return a response of 10.10.10.1 for adverts:
For sites that are allowed to get through, their proper IP address will be returned instead of 10.10.10.1.


