Table of Contents
PFSense - Install pfSense - pfSense Configuration
DNS Server Settings
Navigate to System → General Setup.
In DNS Server Settings:
- DNS servers: Any DNS Servers you want to use. The Servers here are not going to be used, as long as Unbound is not working in Forwarding Mode, so just leave it as default, since we will be using the Resolver Option for Unbound.
- Use Gateway: none. Only needed on Multi-WAN networks. As Unbound will be doing the Resolving, these configuration are not used anyway.
- DNS Server Override: Not Checked. To prevent any DNS configuration setup on the system being overridden by the ISP or other applications.
- Disable DNS Forwarder: Not Checked. To have pfSense use its local cache for lookups.
The DNS Servers here will not actually be used outside of this initial setup. This is because Unbound will be configured as the DNS Resolver; and will handle DNS queries itself.
If, on the other hand, Unbound was configured to Forwarding Mode then it would forward all DNS traffic to the DNS servers here and it would not handle these queries itself. This is not wanted in this setup.
- Click Save.
webConfigurator
Navigate to System → General Setup.
In webConfigurator:
- Dashboard Columns: 3.
NOTE: The number of Dashboard Columns is personal preference. Change as needed.
- Click Save.
Enable SSH Access
Navigate to System → Advanced → Admin Access.
In Secure Shell:
- Enable Secure Shell: Checked.
- SSHd Key Only: Password or Public Key.
- Allow Agent Forwarding: Not Checked.
- SSH Port: 22.
- Click Save.
NOTE: The webConfigurator will reload and the banner will display a red warning sign (to the top right) indicating pfSense has created SSH keys.
Click on Mark all as read to remove the warning.
Firewall & NAT Configuration
Navigate to System → Advanced → Firewall & NAT.
In Firewall Advanced:
- Firewall Optimization Options: Normal. Conservative can also be used, which tries to avoid dropping legitimate idle connections at expense of memory and CPU utilization to help VOIP.
- Firewall Maximum States: <leave at default>. Default.
- Firewall maximum table entries: 1000000. Possibly increased from default setting.
In Bogon Networks:
- Update Frequency: Monthly.
NOTE: Bogon IP addresses and IP ranges are reserved for special use, such as for local or private networks, and should not appear on the public internet.
Bogon addresses are not static. Addresses get assigned and unassigned and changed. So while the core of a bogon list may remain the same for long periods of time the list is dynamic enough to need to be frequently updated in order for it to be used to block.
Bogon packets are useful to cybercriminals because the packets cannot be attributed to an actual host (since the source IP is bogus). Therefore bogon packets are blocked on the WAN interface.
Blocking bogon networks is not suited for use on local/private interfaces such as LAN.
- Click Save.
Networking
Navigate to System → Advanced → Networking.
In IPv6 Options:
- Allow IPv6: Checked.
NOTE: IPv6 could be disallowed here if not needed, but currently left Checked to ensure this is catered for.
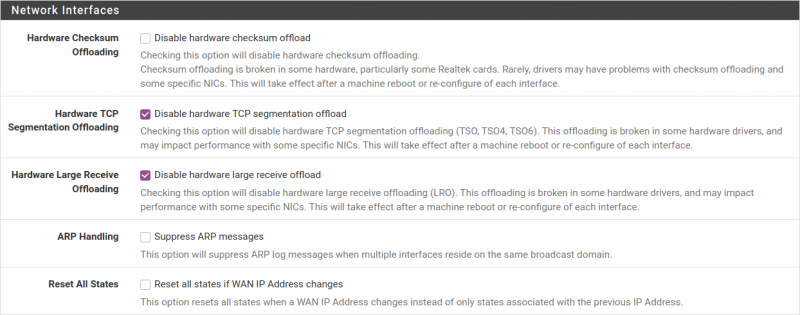
In Network Interfaces:
- Hardware Checksum Offloading: Not Checked. If not using Intel NICs then have this Checked.
- Hardware TCP Segmentation Offloading: Checked.
- Hardware Large Receive Offloading: Checked.
- Suppress ARP handling: Not Checked.
- Reset All States: Not Checked.
- Click Save.
Miscellaneous Configuration
Navigate to System → Advanced → Miscellaneous.
In Power Savings:
- PowerD: Checked.
- AC Power: Hiadaptive.
- Battery Power: Hiadaptive.
- Unknown Power: Hiadaptive.
In Cryptographic & Thermal Hardware:
- Cryptographic Hardware: AES-NI CPU-based Acceleration.
- Thermal Sensors: Intel Core CPU on-die thermal sensor.
NOTE: The Cryptographic Hardware is assuming an AES-NI enabled Processor.
In Gateway monitoring:
- State Killing on Gateway Failure: Not Checked.
- Skip rules when gateway is down: Not Checked.
ALERT: Take special note of the Skip rules when gateway is down option.
One might think that with the check mark unchecked, means that it skips rules when the gateway is down. But no, it means just the opposite!
- By default, when a rule has a specific gateway set, and this gateway is down, a rule is created and traffic is sent to default gateway.
- This option overrides that behavior and the rule is not created when gateway is down.
The end result is that if the rules are routing your private traffic over a VPN, but then the VPN goes down for some reason, the system silently routes your traffic to the default network.
- Not even the firewall logs provide an alert.
- They even show the defined gateway rules still executing properly!
If there is a need to still allow a computer to access the internet anytime (even when VPN is down) then a rule will be needed in Firewall → Rules → LAN to allow the internal IP address there.
- If this access if only needed when the VPN is down, then put it in the LAN firewall rules list after the normal policy-routing rule for VPN traffic.
- That way it only comes into play when the VPN is down.
NOTE: These are important settings to reduce the chance of leaks in the event the VPN goes down for any reason.
- Click Save.
Return to Install pfSense or continue to Create VLANs.


