Table of Contents
Pi-Hole - Setup Pi-Hole running in a container on QNAP Container Station
Create an Ubuntu LXC Container
On the QNAP
- Go into the Container Station.
- Select the Create option from the left side of the menu and then scroll to the bottom of the window.
- There are several types of Docker and LXC containers listed.
- Choose the LXC Ubuntu 18.04 container.
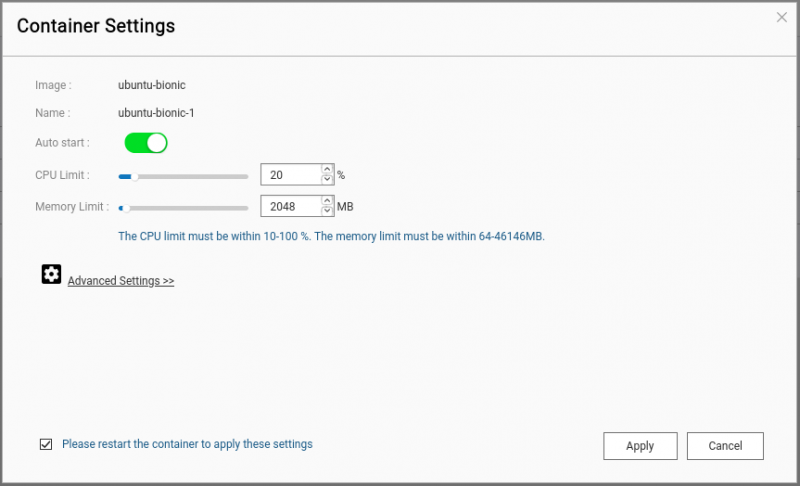
- Name the container, such as “Pi-Hole” and set the CPU limit to 20% and the memory limit to 2048MB which should be sufficient for Pi-Hole.
- The memory can be set higher if needed.
NOTE: A LXC container is used instead of a Docker container.
LXC containers are not just an application instance.
- An LXC Container runs an OS instance, such as Ubuntu, on which you can install one or more applications.
- The LXC container uses a minimal amount of system resources.
- The OS the container runs can easily be updated.
- The applications running in the OS can easily be updated.
- To update Pi-Hole is as easy as running the standard pihole -up command.
Docker containers run a single application installation.
- A Docker Container is based upon a package image, and are therefore not as easy to modify.
- To update Pi-Hole, you would have to create a new container when a new version of Pi-Hole is released.
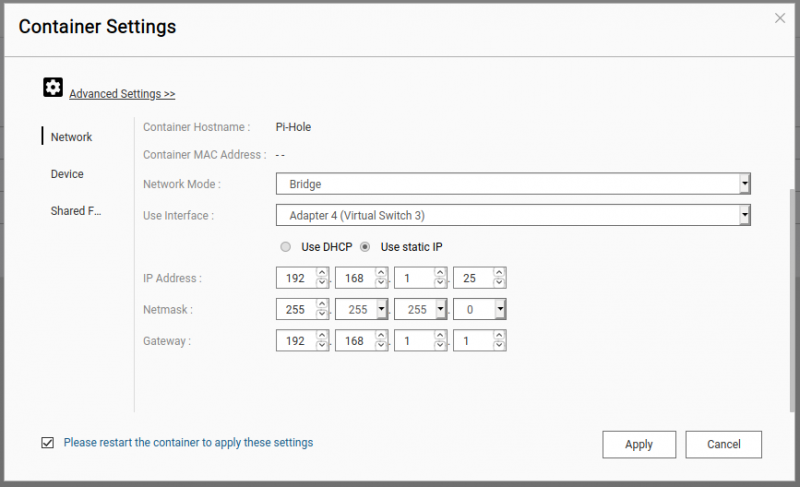
Click on Advanced Settings.
- Change the network mode to Bridge.
- Select Use Static IP and change the IP address to a unique address on your LAN.
- In this example, 192.168.1.25 is used.
Return to the Overview section in Container Station and after a few minutes you should see your container listed.
Click on the name of the container, which will enter the console.
Type passwd to change the password.
NOTE: The original password is ubuntu.
Update and Configure the Ubuntu LXC Container
Update Ubuntu:
sudo apt update
Install the ssh server:
sudo apt install -y openssh-server
Add a username other than the default.
NOTE: Simply answer the prompts for the new user.
sudo adduser piuser
Grant the new user root privileges:
sudo usermod -aG sudo piuser
SSH into the Ubuntu LXC Container
“ssh” to the new machine with the IP address that was used to create the LXC instance:
ssh piuser@192.168.1.25
Get privilege in the command window:
sudo -i
Install “curl”:
sudo apt install curl
Install pi-hole:
curl -sSL https://install.pi-hole.net | bash
ALERT: This option could be dangerous, as it simply runs a script downloaded from the web.
There is no guarantee that this script might contain a trojan etc.
To be extra secure, you could alternatively, just downloads the script using:
curl -sSL https://install.pi-hole.net -o pihole.sh
Then review the script yourself to ensure you are happy with it.
Then install it (making sure it has the right permissions to run).
chmod 777 pihole.sh
bash pihole.sh
Select the defaults until the DNS screen and then choose Cloudflare as the DNS.
- Accept all the rest of the defaults.
- The installation will continue for a while.
- When the installation completes, a message will be shown telling you to set up the DHCP settings on your router to make the address of your Pi-Hole the primary DNS for your network.
- So log into your router and point the DNS settings to the IP address of this container.
When you return to the prompt in the “ssh” terminal session, enter the following command to set your Pi-hole password:
pihole -a -p
NOTE: The “ssh” terminal session can now be closed.
Access the Pi-Hole Website
Within a web browser, enter the IP address of your Pi-Hole followed by /admin:
http://192.168.1.25/admin
Click login and you should be able to log in with the password you just set.
NOTE: You will be able to start and stop the LXC container and reboot the QNAP NAS without any problems and even upgrade Pi-Hole when new releases are available.
IMPORTANT: Do not forget to set the DNS settings for your DHCP server on your router because Pi-Hole will not be used by any of your network clients until that occurs.
A good practice is to make the Pi-Hole DNS 1 and then Cloudflare 1.1.1.1 as DNS 2.
That will assure DNS translation when your Pi-Hole is not running.

